
It’s a typical day in Portland and you’re driving to your destination, obeying the speed limit and navigating the canal that is I-5 during the monsoon-level deluge that our beloved city is known for. You’re movin’, you’re groovin’ and you’re about to wish you wore the brown pants today.
Between wiper strokes, you see a puddle suddenly appear in the road in front of you. It’s far too late to slow down, so there you are: braced, puckered and careening towards the scene of an accident. As your front wheels hit, you hear the WOOSH of water spraying the insides of your wheel wells and you feel the steering wheel go light in your hands. Your rear wheels hit the puddle and your car begins to rotate. Gulp.
Suddenly, your front wheels leave the puddle and regain traction, snapping the car in the opposite direction of rotation, and spilling your $18 iced coffee everywhere. Best case, the only brown in your interior is your overpriced coffee. Worst case… well, let’s keep things lighthearted, shall we?
First of all, what the hell happened and how do we prevent it (those coffees aren’t exactly cheap, you know)? Well, you hydroplaned (or aquaplaned, if you’re from across the pond) and it’s due to that puddle, specifically the water that is in the puddle.
Basically, all you need to know is that water is an incompressible fluid (and a tenacious bugger, at that) and fights back the more you push on it, hence the term “incompressible.” Because you were travelling at such speed, the water couldn’t get out of the way in time and caused your tires to skim across the surface of the puddle, eliminating your traction and leaving you at the mercy of fluid dynamics. Sketchy!
The video above is a good example of hydroplaning (no pun intended). The plane isn't so much flying anymore as much as it is "skipping" over the surface of the lake. The exact same principle is happening with your tires when you hit that puddle and send your iced coffee flying.
Reducing speed is a great way to prevent hydroplaning from happening, but sometimes you just can’t, so let’s focus on the variable we can control: tires.
Your car’s only interface with the road below you is the four patches of rubber beneath each tire and each one of those patches is responsible (in part) for speeding up, slowing down, turning, expelling water, etc. Your tires are ultimately responsible for 100% of your traction, which is a big ask for a few square inches of rubber!
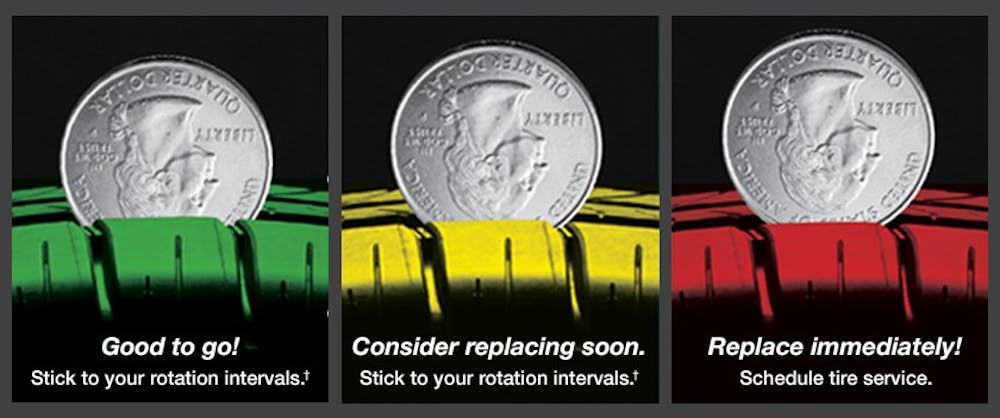
Let’s start with The Big Question. Do you even need new tires? Let’s take a look at what you’ve got and go from there. Pick your favorite corner of the vehicle and start with that tire. Inspect the tread of your tire (the part with the grooves). We’re looking for signs of wear more than anything. Telltale signs of worn tires are shallow channels between tread blocks and signs of delamination or “chunking” of the rubber, as well as cracks that have formed in the tread or sidewall. A lot of tires these days have wear bars built into them, so look for those while you examine your tread. You can also use a tread gauge or a quarter. If you opt for the College Student Method Of Choice and use a quarter and you can see Washington’s noggin, new tires are in your near future. (Quick technical note: the classic approach is to use a penny to check wear in the same way described above. This indicates a 2/32” remaining tread depth. This is an adequate minimum for dry climates, but for us here in Portland, we need to use a quarter since the minimum effective tread depth for evacuating water from under a tire is 4/32”. Lots of snow or slush? You’re going to want 6/32” or more)
Okay, let’s assume your tread looks decent. Worn, but reasonable (or so I hope). Now we need to check the date code to see how old the tires are. Examine the sidewall of the tire (the part where frosting would be if the tire was one big doughnut). Look closely for cracking. Signs of cracking? Time to replace those tires. Otherwise, look for the date code (shown below). This number is formatted as four numbers designating the week and year of manufacturing (2112 would be the 21st week of 2012).
Tires are generally only “good” for 5-6 years after their manufacturing date (yes, your tires expire just like that oatmilk in your iced coffee). Large temperature swings and UV radiation deteriorate the rubber compound, accelerating wear and also breaking down the compound causing the tire to grip less, even in ideal conditions. Using the example 2112 date code above, that would mean you’re long overdue for tires so let’s get rollin’.

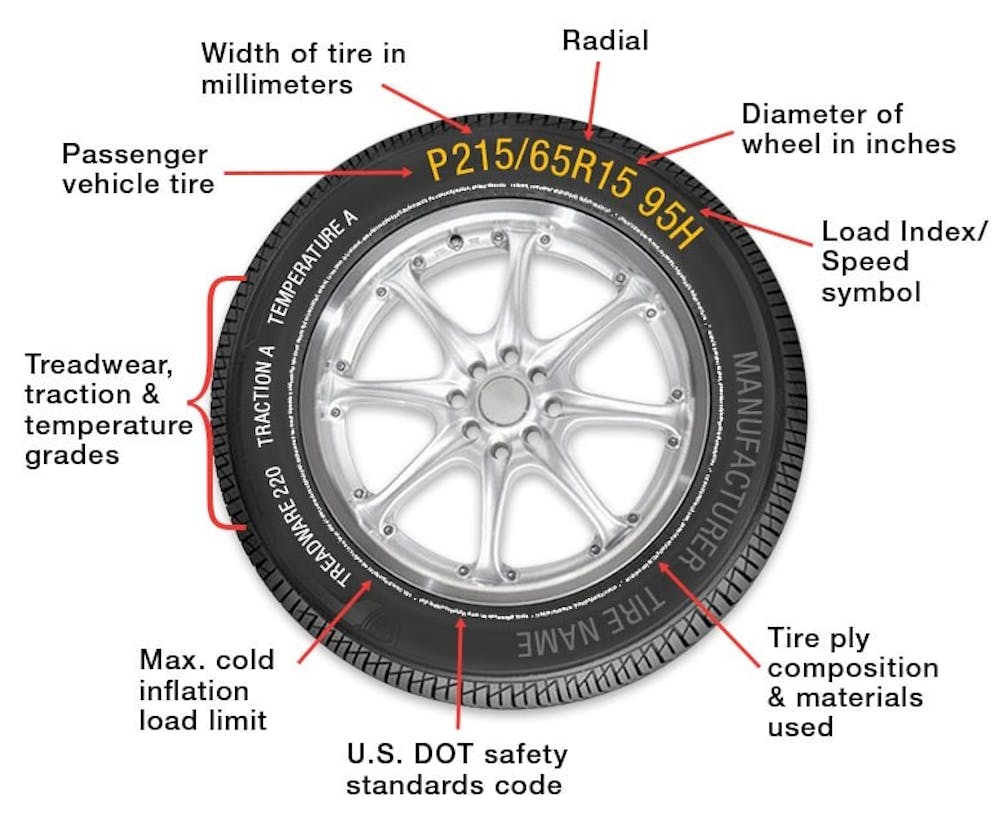
Okay, so how do we pick tires? First, let’s start with size. The best place to look initially is in the driver’s door jamb for a little placard. It is best practice to check this first because the tires on your vehicle may not be the size that it was designed for, which can lead to many problems, including your speedometer reading incorrectly. Most vehicles use a “square setup” meaning that all four tires are the same size, though some cars use a “staggered setup,” meaning that the front and rear tires are different sizes. The placard should state the recommended size(s) of each tire in the form of three funny little numbers that should look something kind of like this:

The numbers represent the width of the tire (in millimeters, not inches!), the aspect ratio of the tire (the ratio of the tire’s height to its width), and the diameter of the compatible wheel (in inches, not millimeters!). This is a disaster in terms of units and calculations but the powers at be said this is the best way to do it. I’m skeptical, but alas, I am not the powers that be. It is worth comparing the numbers on the sidewall to those on the placard just in case your car has aftermarket wheels on it. If they do not match, stick to the size that’s on the sidewall because you know that it will fit on the wheels you have.
Now, it’s time to actually start looking for tires. Of course, you can always walk into a Costco or a Les Schwab and ask for tires, but you’re at the mercy of their inventory, suppliers, and pricing. In my experience, I have found it to be a better experience if I choose and buy my tires separately and then bring them to a shop to have them mounted and balanced (for usually the same price or often cheaper). Discount Tire is a great resource when executing this strategy. Places I usually check for tires are as follows: Tire Rack, Discount Tire and Simple Tire.
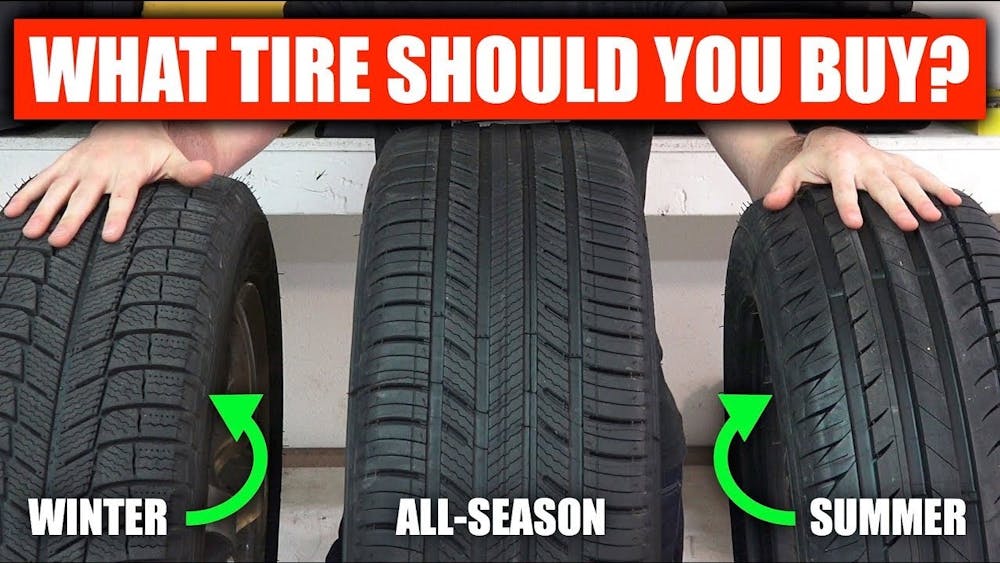
The next hurdle is going to be selecting the specific model of tire. Tire models typically vary in construction, tread pattern, compound and treadwear depending on the intended use case. For example, if you were buying high performance tires for a trackday, they would look something like the tires on the right. If you were buying tires for every season in the year (specifically for the rain), you would buy something like the ones in the middle. If heavy snow and ice are in your future, you’d likely be looking for something like the tire on the left.
Let’s pick tires for the average Portlander. We’re shopping for Portland’s best-selling car, the Subaru Outback, and we like to get outdoors on the weekends, we like saving money on vehicle operating costs (so we can buy more iced coffee!!) and we like a relatively quiet driving experience. This means we’re going to be looking for some off-road-capable all-season touring tires in the factory size.
Discount Tire gives us some options, but these are standout picks for our Portlander’s lifestyle: Michelin Defender LTX M/S, Falken A/T Trail, and Yokohama YK-CTX. These tires are touring-focused all seasons with respectable off-road capability coming in at $174, $150, and $189 respectively for a single tire. There are cheaper options, of course, but similar care should be taken when choosing tires that you would take when choosing a helmet or other protective equipment; the cheapest option can end up costing you the most in the end.
I personally like where the Michelin sits. It’s the middle of the price range, its tread is more street-focused than the Falken, but not as street focused as the Yokohama, has a reinforced sidewall to help prevent punctures in off-roading scenarios, and has better wet (and dry!) weather performance than the other two to boot. The Michelin would be my pick, though I will say that Ohtsu FP7000’s hold a special place in my heart for being an outrageously good tire for the price point.
So there you have it. Please check your tires, it’s the responsible thing to do. And I’d really hate to have to give you a hard copy of this piece along with my insurance information if you happen to (literally) run into me in the real world.
Brennan Crowder is the Multimedia Editor for The Beacon. While he is a consumer of tires, he is not a legal advisor and takes no responsibility for the actions of the reader should they choose to act on his recommendations. He can be reached at crowder22@up.edu.
Have something to say about this? We’re dedicated to publishing a wide variety of viewpoints, and we’d like to hear from you. Voice your opinion in The Beacon.